DEVELOPERS
Co-Create, Extend, Experience
For all MAGES SDK and MAGES SDK Freemium account holders we provide access to our extensive online documentation (over 350 pages including detailed tutorials, getting started guides, video guides and API documentation) as well as a vibrant online developer community forum. For the full MAGES SDK subscription accounts we provide dedicated slack channel support as well as a Customer Success Manager.
SIM ACCOUNT OWNERS
Co-Create, Extend, Experience
For all MAGES SIM account owners, you can get support from the previous online forum as well as the dedicated portal. The portal also provides access to all your previous sessions as well as user analytics and performance assessments.
SUPPORT
Explore, Experiment, Learn
For all other general MAGES platform questions you may refer to our online forum. A FAQ section is provided below.
For any other issues you may contact our support team: support at oramavr.com
MAGES SDK
Operating System
- Windows 10 or later
- MacOS Catalalina 10.15
or later
RAM
- Minimum 8GB DDR3
GPU
- Integrated Intel HD Grphics 620 DX12 integrated GPU
- AMD Radeon RX 460/560
- GeForce GTX 1060
CPU
- Intel Core i5 4590 (4th gen)
- Intel Core i5 7200U (7th gen mobile)
- AMD Ryzen 5 1400
Unity Version
- 2020.9.3f1
Unreal Engine Version
- 4.26
MAGES SIM/APP
Operating System
- Windows 10 or later
- Mac OS Big Sur 11.0 or later
- Android OS
RAM
- Minimum 8GB DDR3
GPU
- Integrated Intel HD Grphics 620 DX12 integrated GPU
- AMD Radeon RX 460/560
- GeForce GTX 1060
CPU
- Intel Core i5 4590 (4th gen)
- Intel Core i5 7200U (7th gen mobile)
- AMD Ryzen 5 1400
VR HMDs
Windows Mixed Reality
- Lenovo Explorer
- Dell Visor
- Acer AH101-D8EY
- HP Windows Mixed Reality Headset
- Asus Windows MR (HC102)
- Samsung Odyssey
Oculus Rift
Oculus Rift S
HTC Vive
- HTC Vive
Oculus Quest (through Oculus Link)
Oculus Quest 2 (through Oculus Link)
Standalone Headsets
- HTC Vive Focus
- HTC Vive Focus Plus
- HTC Vive Focus 3
- Lenovo Mirage Solo
- Oculus GO
- Oculus Quest
- Oculus Quest 2
- Pico Neo
- Pico Neo 2
- Magic Leap
- Microsoft HoloLens
FAQ
What exactly is the MAGES SDK?
MAGES SDK is a low-code Software Development Kit that can empower one developer with basic knowledge of the Unity or Unreal 3D Engines to prototype in few weeks and in 5 steps any complex, high fidelity medical XR training simulation software application. It provides algorithmic solutions to complex computational science bottlenecks that current practises and standards are solving them by employing manual work, large teams, lengthy authoring schedules and thus high cost to produce a final monolithic application that cannot be easily extended or updated or replicated.
What is the difference between a low-code SDK and an Editor that others are offering?
A low-code Software Development kit allows to prototype any software application from the ground-up using visual scripting instead of direct, lengthy, error-prone coding. An editor assumes the existence of the application and enables fixed, rigid customisation of some of its aspects that can be parameterised. An editor cannot generate anything that was not originally previewed in the providing editing user interface.
What are differences between MAGES SDK and MAGES SDK Free?
MAGES SDK Free contains all the features of the MAGES SDK, except a) unlimited Actions (i.e. complexity of a medical XR training simulation) b) cloud services and of-course c) commercial use. It is provided as an ideal starting, so that you can test-drive our novelties and see what amazing things you can build with it.
What are the differences between MAGES SDK, SIM, APP?
MAGES SDK is a software development kit that is offered via a SaaS mode annual subscription. MAGES SIM is a service we provide, that we co-author with selected partners that qualify our process to truly create the next ground-breaking, scientifically proven and verified medical XR training simulation. MAGES App is our marketplace, of scientifically verified in clinical pilots medical XR training simulations with proven skills transfer from virtual to real environments.
What do I need to get started today with MAGES SDK?
One of our Hospital partners hired one developer and in less than 4 weeks he had already prepared for them a first demo medical XR training simulator. We are even providing basic anatomical and Operating Room 3D assets as part of our sample applications, so that you can kick-start immediately your medical XR training simulators.
Why should I use MAGES SDK and not MAGES SIM or another outsourcing solution?
With MAGES SDK and minimum 1 developer, you can be building up to 10 medical XR training simulations per year, owning them fully, extending them and even monetising them in our MAGES APP so that other medical institutions can license them. With MAGES SIM there is the one time cost to consider and ofcourse you need to enter our production pipeline schedules. However, our MAGES SIM is backed by our full academic, scientific expertise and rigorous standards that aim to test/prove that skills transfer from the virtual to the real will be realised.
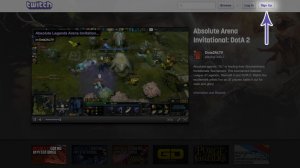
How do I create a Twitch account to actively participate on the webinars?
To sign up for an account, go to https://www.twitch.tv/ and select the “Sign Up” button on the top-right portion of the page.
This will open the Log In / Sign Up screen. To sign up for a new account on Twitch, fill out the form on the right-hand side, choosing a username, password, email and by telling us your date of birth.
Alternatively, you may also sign up for a Twitch account by using your Facebook account, achieved by selecting the “Connect with Facebook” button.
How do I host a Co-op session?
1. Once you start the simulation, you will be greeted with two options.
Starting the simulation in Single Player, or go to Online Sessions:

2. Select the Online Sessions.
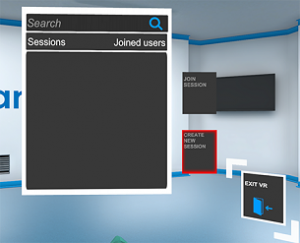
There you will be able to create a new session and wait for other to join, or join an existing session that is demonstrated on the Sessions board.
3. To Create a session, select the Create New Session, as illustrated:
4. Wait for others to join.
If at least one more user has joined, you will be able to start your online session.

5. If you want to go back, select Exit VR to quit.
Note: If you are using older versions of our simulation, please refer to this video for instructions
How do I join a Co-op session?
1. Once you start the simulation, you will be greeted with two options.
Starting the simulation in Single Player, or go to Online Sessions.
2. Select the Online Sessions.
There you will be able to create a new session and wait for other to join, or join an existing session that is demonstrated on the Sessions board
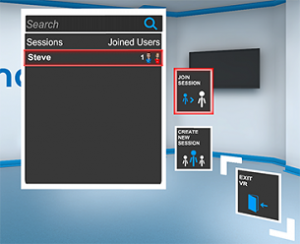
3. Select an available session from the Sessions board, and select Join Session.
Each available session will demonstrate all connected users.
4. If you want to go back, select Exit VR to quit.
Note: If you are using older versions of our simulation, please refer to this video for instructions
How can I enable screen casting to my computer using Oculus Quest?
With screen casting, you will be able to view the screen of your Oculus Quest 2 in your computer. Screen casting is done wirelessly. To enable it, please follow the steps below.
Important: Use the Google Chrome Browser as other browsers may not support this feature.
1. Make sure your computer and your Oculus Quest 2 headset are both connected to the same Wi-Fi network.
2. Through your computer, open a browser and navigate to https://www.oculus.com/casting .
3. Use the username and password that ORamaVR provided you with, to login.
4. Once logged in, you will see a page like the following:
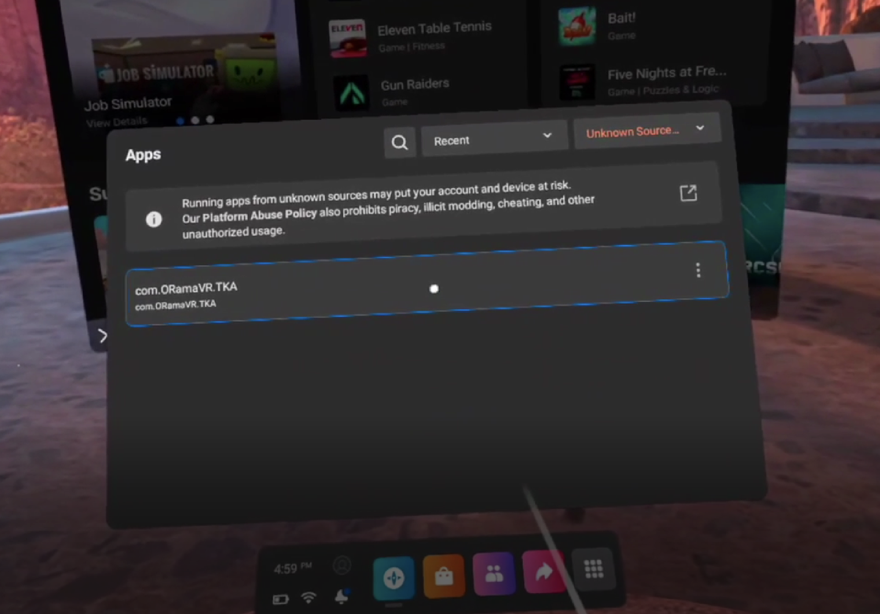
5. From your Oculus Quest 2, choose and run an application (for instance com.ORamaVR.TKA, located in the Uknown Sources section of the headset applications).
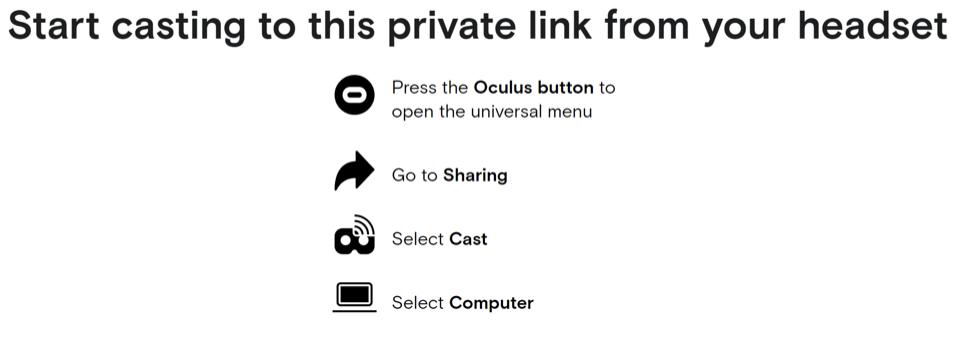
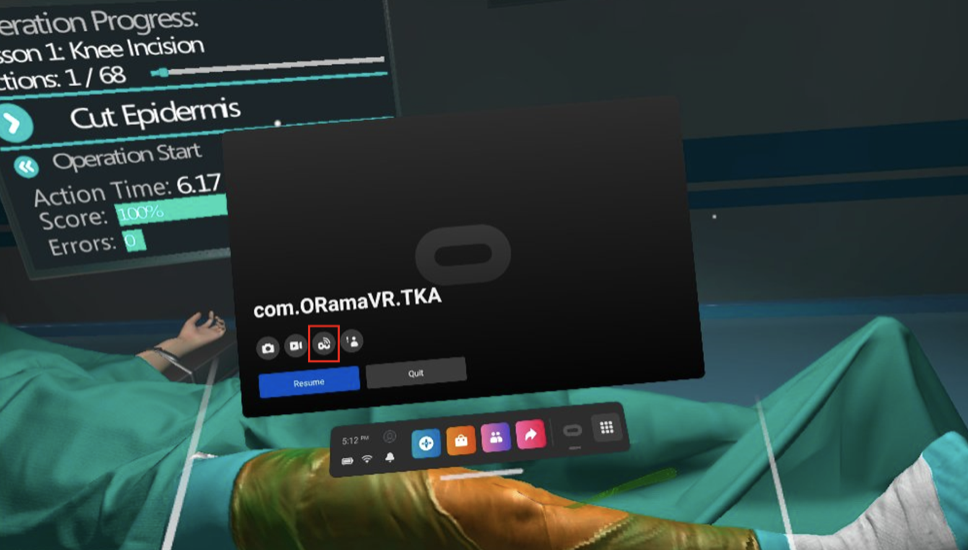
6. Once the application starts, press the oculus button on the right controller to open the oculus menu.
7. Select the screen casting button.
8. From the next window, select the Computer option and then Next.
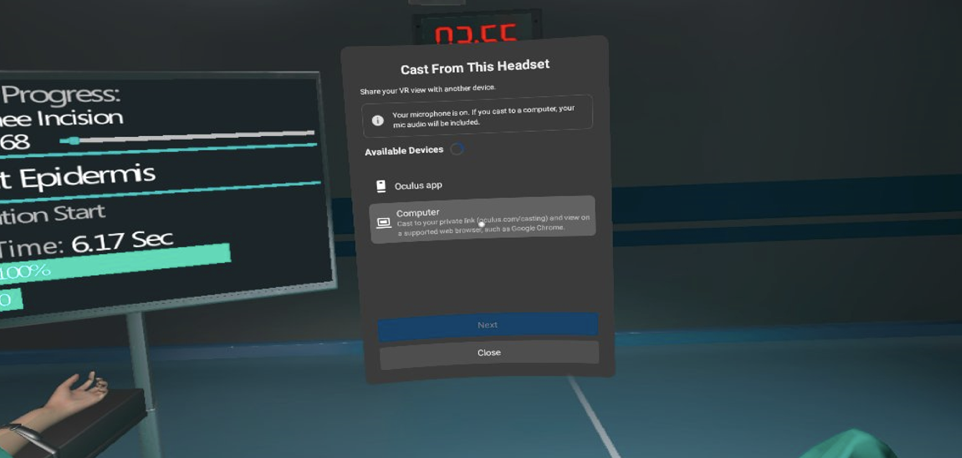
After this step the screen casting starts. You can view it in your computer screen, in your browser.